on
Visualising n-dimensional features
Wre can easily plot 2 & 3dimensional data very easily with matplotlib and other libraries supporting it. The very problem in plotting comes with more than 3-dimensional data.
In machine learning, usually features are n-dimensional data where n>3. At times it becomes necessity to be able to plot these n-dimensional data for data exploration.
Recently, I had data of about 100 dimensions and my clustering model was not performing well at all. It became very much important to know how this 100-dimensional data has spreaded in its spatial space. Or to say in another words, is there any variance in the data or all the data are lying very close to each other. If the data were lying close to each other then intuitively clustering will not be effective.
So I had to find a way to reduce dimension of 100-dimensional data to either 2 or 3 dimensions to plot it. After going through few readings, I came across using autoencoders which produces low-dimensional representation of the input.
How AutoEncoder Works?
There are many variant of autoencoders which differ from the vanilla autoencoder in slight ways. Here we will be going through vanilla autoencoders working and how I implemented it in PyTorch to solve my plotting problem.
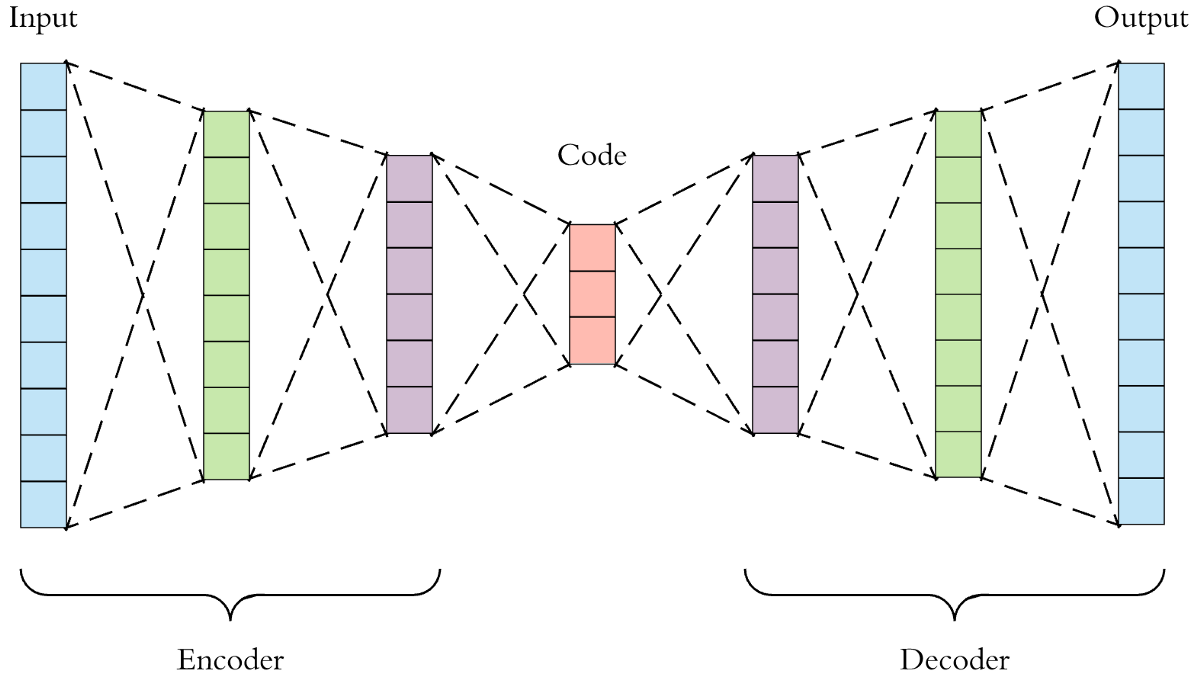
Autoencoders takes some input and tries to output the same input. And in this process, it learns inputs’ feature representation. Autoencoder consists of two major parts: encoder and decoder. The encoder encodes the input into low-dimensional representation which is then fed into decoder which outputs the input.

In the above image, on left there is an encoder taking some input and producing low-dimensional representation at code layer above. Code layer’s output are then fed into decoder and produces the same input which is fed into encoder.
In sophisticated terms, the low-dimensional feature representation is also called as embeddings.
Let us see the implementation of autoencoder in PyTorch.
class autoEncoder(nn.Module):
    def __init__(self, input_dim):
        super(autoEncoder, self).__init__()

        self.input_layer              = nn.Linear(input_dim, 75)
        self.encoder_hidden_layer_one = nn.Linear(75, 25)
        self.encoder_hidden_layer_two = nn.Linear(25,2)

        self.decoder_hidden_layer_one = nn.Linear(2, 25)
        self.decoder_hidden_layer_two = nn.Linear(25, 75)

        self.output_layer             = nn.Linear(75,100)

    def forward(self, input):
        output = (self.input_layer(input))

        output = self.encoder_hidden_layer_one(output)
        embed  = self.encoder_hidden_layer_two(output)

        output = self.decoder_hidden_layer_one(embed)
        output = self.decoder_hidden_layer_two(output)

        output = self.output_layer(output)

        return output, embed
The embed in the above code is the embeddings which are low-dimensional representation of the input. I have input of 100 dimensions and wanted to project them into 2 dimensions. embed outputs 2 dimensional data and that is what I am looking for. And if you notice, the last linear layer outputs 100 dimensional data which is equal to dimensions of input.
In machine learning, model usually learn the weight parameters by keeping its outputs against corresponding targets. Autoencoder will learn its weight parameters against its input itself, as it is producing its input as the output.
Let us see the dataset class in PyTorch.
class autoencoderDataset(Dataset):
    def __init__(self, dataset_file):
        data_frame   = pd.read_csv(dataset_file, sep=" ", header=None)

        self.data_np = data_frame.to_numpy()

    def __len__(self):
        return self.data_np.shape[0] # Returning nos. of rows

    def __getitem__(self, idx):
        return {
            "X": torch.tensor(self.data_np[idx]),
            "Y": torch.tensor(self.data_np[idx])
        }
data_frame is the input of the model. Look carefully at __getitem__(), it is returning the same thing for X and Y which is the data_frame.
And that’s how the autoencoder works guys. You can find the whole code here
Discussion and feedback